

The emergence of the blockchain paves the way for new business models, doing away with the intermediaries, who add no value to the transaction. From banking to royalty payments, blockchain will disrupt the incumbents in multiple industries while creating a more decentralized world.
Prerequisites
Ethereum and Solidity Programming Language.
Ethereum IDE
Faucet and testnet
This article will focus on building an ERC20 token using the Openzeppelin standards and is structured.
Logic & Interface of Openzappelin Guide
Token Creation
Interaction with token contract
Deploying to Testnet
Logic & interface of openzeppellin guide.
ERC is an acronym for Ethereum Improvement Proposal. Each ERC is a set of rules and standards defined on top of the Ethereum blockchain. An interface is the general description of a set of an object without declaring the behavior of the objects.
A real-world example of this will be a vehicle.
Imagine the term a vehicle could be a car, truck, or even a motorcycle. Despite their differences, they are all still regarded as vehicles regardless of how big or how it's constructed.
Object Properties
Seat
Clutch
Brake
This implementation may differ on the various kinds of vehicles but they all share the same parameters and methods of functioning.
An interface defines the abstract definition of the parameters and methods without defining their Logic or implementation. Each object can implement the interface and add its version of the Logic to it.
Token Creation.
The token standard ERC-20 tells us what functionality the contract needs to comply with and how the functionality is up to you as a developer to implement. Use the ERC-20 openzappellin guide to build our first smart contract token. More details on ERC standards and Openzapplin
We will create our token, LifeToken, inheriting the functionality from the OpenZepplin ERC20 token contract implementation we imported.
// SPDX-License-Identifier: MIT // Uing a linsense
pragma solidity ^0.8.3; // declaring the version of solidity

import "@openzeppelin/contracts@4.4.0/token/ERC20/ERC20.sol";
The contract implements the optional functions name() and symbol() of the ERC20 Token Standard and has a constructor where their values can be set during the deployment of the token.
In this case, we are going to use the default values. We will call our token the same as the contract "LifeToken" and make "LT" its symbol.
contract LifeToken is ERC20 {
    constructor() ERC20("LifeToken", "LT") {
        // code in here
    }
}
Next, we will make use of the inherited _mint function that allows us to create tokens upon deployment of the contract.
Inside the parameters, we specify the address of the account that receives the tokens and the number of tokens created. In this case, the account that deploys the contract will receive the tokens, and we set the amount to 1000000 to the power of decimals(). The optional function decimals() of the ERC20 token standard is implemented and set to the default value of 18. Next, we will create 1000000 tokens with 18 decimal places, which looks like this.
// SPDX-License-Identifier: MIT
pragma solidity ^0.8.3;

import "@openzeppelin/contracts@4.4.0/token/ERC20/ERC20.sol";

contract LifeToken is ERC20 {
    constructor() ERC20("LifeToken", "LT") {
        _mint(msg.sender, 1000 * 10 ** decimals());
    }
}
That's it; we've built an ERC20 token standard using the openzeppelin implementation.
Interaction with token contract
To interact with the token contract, we must deploy it to see if the functions are implemented. Deploying to testnet is a sub-copy of mainnet as there is little difference.
Ethereum has created an online IDE that enables developers to test smart contracts quickly and deploy them to testnet.
More guide on how to work with Ethereum online IDE
Upon deploying the token contract, we have a result like this.
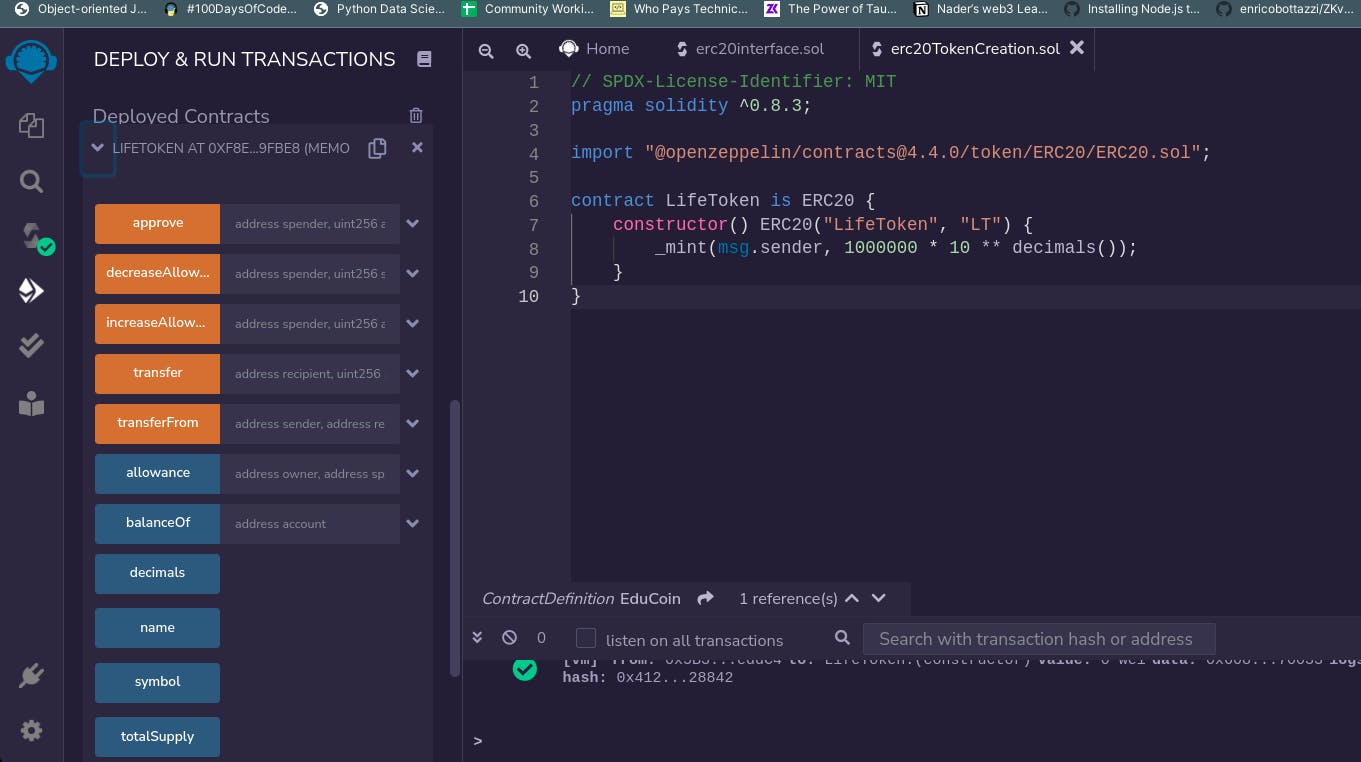
We can interact with the deployed contract.
Deploying to testnet.
While we've interacted with the deployed token contract, it's time to push it to a live testnet rather than the Javascript virtual machine.
Now we recompile and deploy but use the injected web3, which connects your metamask wallet to it. This guide.
And within short minutes, you find on the testnet up and running.